Enchilada Whole Chicken Recipe – Cheesy and Easy Dinner
Imagine a dinner that combines the succulent, juicy tenderness of a classic Sunday roast chicken with the bold, smoky, and vibrant flavors of a traditional Mexican enchilada. This Enchilada Whole Chicken is not just a meal; it is an experience. It transforms the humble whole bird into a festive masterpiece, smothered in a rich, red enchilada sauce and blanketed under a gooey layer of melted cheese.
Whether you are looking for a show-stopping centerpiece for a weekend gathering or a clever way to meal-prep for the week, this recipe delivers on every front. It is budget-friendly, high in protein, and surprisingly simple to execute. In this guide, we will dive deep into every aspect of creating the perfect Enchilada Whole Chicken—from choosing the right bird and mastering the spice rub to selecting the best side dishes and repurposing leftovers like a pro.
Why This Recipe Works
The magic of this dish lies in the combination of techniques. Roasting a whole chicken allows the fat from the skin to render down, basting the meat in its own juices. By adding a layer of enchilada sauce during the final stages of cooking, you infuse the meat with moisture and a deep, complex flavor profile that goes far beyond a standard salt-and-pepper roast.
The addition of cheese at the very end creates a “gratin” effect, sealing in the moisture and providing that irresistible, stretchy texture that makes enchiladas a fan favorite. It’s a low-carb alternative to traditional enchiladas (if you skip the tortillas) but keeps all the comfort-food qualities intact.
Choosing Your Chicken: Sourcing and Preparation
The foundation of this recipe is, of course, the chicken. To ensure the best results, consider the following:
- Size Matters: Look for a “fryer” or “roaster” chicken between 3.5 to 4.5 pounds. This size ensures the meat cooks through evenly without the exterior drying out.
- Quality of Meat: If your budget allows, opt for an organic or pasture-raised chicken. These birds often have a higher fat content and a richer flavor profile compared to conventional birds.
- The Dry Pat Method: Before you even think about seasoning, use paper towels to pat the chicken completely dry. Moisture is the enemy of crispy skin. Even though we will be saucing the chicken later, starting with dry skin allows the spice rub to adhere better.
- Room Temperature: Take the chicken out of the refrigerator about 30 to 45 minutes before cooking. This takes the chill off and ensures the bird cooks more evenly.
The Flavor Foundation: The Ultimate Enchilada Dry Rub
Before the sauce comes the rub. This layer of seasoning is crucial because it penetrates the meat as it roasts. You want a balance of heat, earthiness, and salt.
The Perfect Spice Blend:
- Smoked Paprika: Provides a deep, wood-fired flavor.
- Chili Powder: The backbone of Mexican-inspired seasoning.
- Cumin: For that essential earthy, nutty aroma.
- Garlic and Onion Powder: For savory depth.
- Dried Oregano: Preferably Mexican oregano, which has citrusy notes.
- Cayenne Pepper: Optional, for those who want a spicy kick.
- Kosher Salt and Coarse Black Pepper: To enhance all other flavors.
Mix these spices with a bit of olive oil or avocado oil to create a paste. Rub this paste under the skin of the breasts and thighs, as well as over the entire exterior. This ensures the flavor isn’t just on the surface but is infused into the meat itself.
The Sauce: Homemade vs. Store-Bought
The sauce is the heart of this dish. You have two paths: convenience or craft.
The Convenience Path
If you are short on time, a high-quality store-bought red enchilada sauce works perfectly. Look for brands that use real chili solids rather than just tomato paste and water. Check the ingredient label for “guajillo” or “ancho” peppers for the most authentic flavor.
The Craft Path (Homemade Sauce)
Making your own enchilada sauce is surprisingly easy and significantly elevates the dish.
- Toast Flour: Heat a little oil in a pan and whisk in flour to make a light roux.
- Add Spices: Whisk in chili powder, cumin, garlic powder, and oregano.
- Liquify: Slowly pour in chicken stock and a small amount of tomato paste.
- Simmer: Let it thicken until it coats the back of a spoon. Finish with a splash of apple cider vinegar to brighten the flavors.
Step-by-Step Cooking Guide
Phase 1: The Initial Roast
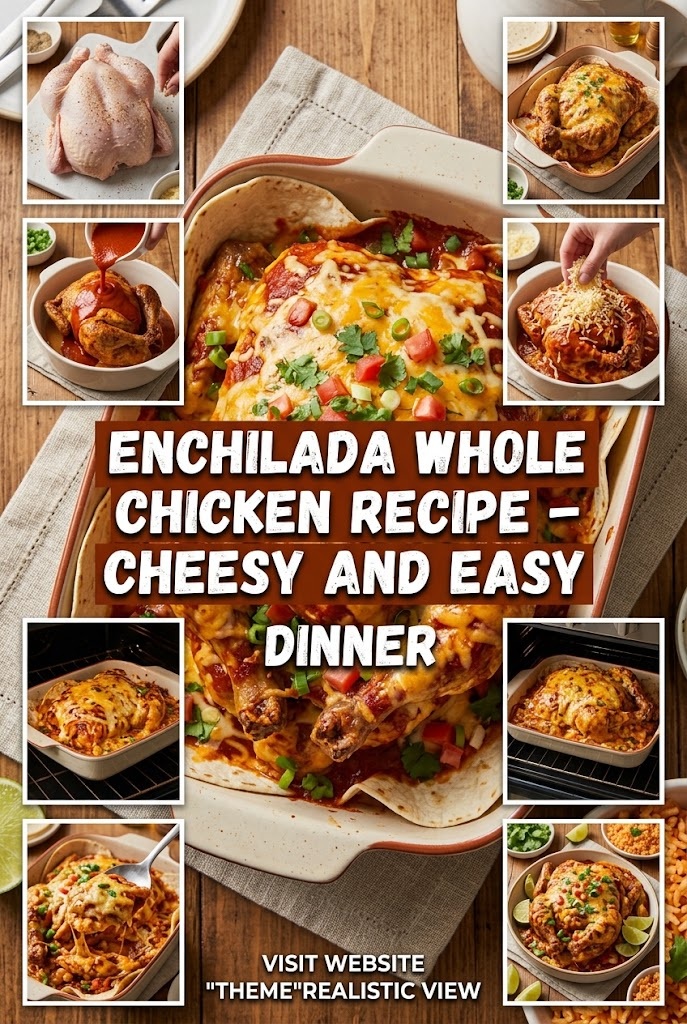
Preheat your oven to 400°F (200°C). A higher temperature initially helps to render the fat and start the browning process. Place the seasoned chicken in a cast-iron skillet or a roasting pan. Roast for about 45–50 minutes. At this stage, the chicken should be golden but not fully cooked.
Phase 2: The Saucing
Take the chicken out of the oven. Generously pour 1.5 to 2 cups of enchilada sauce over the bird. Use a brush to ensure every inch is covered. Some of the sauce will pool in the bottom of the pan—this is a good thing! It will mix with the chicken drippings to create a delicious jus.
Phase 3: The Cheesy Finish
Lower the oven temperature to 375°F (190°C). Sprinkle a generous amount of shredded cheese over the chicken.
- Top Picks: Monterey Jack (excellent melt), Sharp Cheddar (bold flavor), or Chihuahua cheese (authentic Mexican melting cheese). Return to the oven for another 15–20 minutes, or until the internal temperature of the thickest part of the thigh reaches 165°F (74°C) and the cheese is bubbly and slightly browned.
Phase 4: The Rest
This is the most skipped but most important step. Let the chicken rest for at least 15 minutes before carving. This allows the juices to redistribute, ensuring every bite is moist.
Techniques for Success: Spatchcocking
If you want to reduce cooking time and ensure even more surface area for sauce and cheese, try spatchcocking (butterflying) the chicken.
To spatchcock:
- Turn the chicken breast-side down.
- Using heavy-duty kitchen shears, cut along both sides of the backbone to remove it.
- Flip the chicken over and press down firmly on the breastbone until it cracks and the chicken lies flat.
- Roast as directed, but note that the cooking time will be reduced by about 15–20 minutes.
Spatchcocking is ideal for this recipe because it allows the enchilada sauce and cheese to cover the entire bird evenly, rather than just the top.
Low-Carb and Keto Considerations
This Enchilada Whole Chicken is naturally a fantastic option for those following a low-carb or ketogenic diet. To keep it strictly Keto:
- Check the Sauce: Ensure your enchilada sauce doesn’t have added sugars or cornstarch.
- Skip the Beans: When serving, opt for cauliflower rice or a fresh green salad instead of traditional rice and beans.
- Extra Fat: Feel free to top the finished chicken with plenty of avocado or a dollop of full-fat sour cream.
Side Dish Pairings: Creating a Complete Feast
To make this a full meal, you need sides that complement the bold, spicy flavors of the chicken.
1. Mexican Street Corn (Elote)
Grilled corn on the cob slathered in mayo, cotija cheese, lime, and chili powder. The sweetness of the corn provides a beautiful contrast to the savory chicken.
2. Cilantro Lime Rice
A light, aromatic rice that acts as a canvas for the extra enchilada sauce pooled in the roasting pan. Use basmati or long-grain white rice for the best texture.
3. Refried Black Beans
Creamy black beans seasoned with garlic and a hint of cumin. They add a hearty, earthy element to the plate.
4. Avocado Salad
A simple mix of diced avocado, cherry tomatoes, red onion, and lime juice. The acidity cuts through the richness of the cheese and chicken skin.
5. Warm Tortillas
If you aren’t watching your carbs, serve the chicken with warm corn or flour tortillas. Diners can shred the chicken right at the table to make their own “deconstructed” enchilada tacos.
The Art of Leftovers: Transforming Your Meal
One of the best things about roasting a whole chicken is the leftover potential. This Enchilada Whole Chicken is the gift that keeps on giving.
- Enchilada Chicken Tacos: Shred the remaining meat and reheat it in the leftover pan sauce. Serve in charred tortillas with pickled red onions.
- Cheesy Chicken Soup: Use the carcass to make a flavorful stock. Add the shredded leftovers, a can of black beans, corn, and a little more enchilada sauce for a quick “Enchilada Tortilla Soup.”
- Mexican Grain Bowls: Layer shredded chicken over quinoa or brown rice with black beans, roasted sweet potatoes, and a lime-crema drizzle.
- Enchilada Salad: Cold shredded chicken over romaine lettuce with roasted corn, black beans, and a creamy chipotle dressing.
Frequently Asked Questions
Can I make this in a slow cooker?
Yes! While you won’t get the crispy skin, a slow cooker produces incredibly tender meat. Place the seasoned chicken in the slow cooker with a cup of sauce. Cook on Low for 6-7 hours. Add the cheese in the last 20 minutes. For a browned finish, you can pop the cooked chicken under the oven broiler for 5 minutes after slow cooking.
Can I use green enchilada sauce (Salsa Verde)?
Absolutely. A “Green Enchilada Whole Chicken” is a delicious variation. Use a tomatillo-based green sauce and pair it with Monterey Jack or Swiss cheese. This version tends to be slightly tangier and less smoky.
How do I prevent the cheese from burning?
The key is timing. Don’t put the cheese on at the beginning. If the cheese stays in the oven for an hour, it will become oily and tough. Only add the cheese for the final 15–20 minutes of roasting.
My sauce is sliding off the chicken, what should I do?
To help the sauce “stick,” make sure you’ve roasted the chicken long enough for the skin to become textured. You can also thicken your sauce slightly with a tiny bit of cornstarch slurry before pouring it over the bird.
What is the best way to reheat leftovers?
To keep the chicken from drying out, reheat it in the oven at 325°F covered with foil. Add a splash of water or extra sauce to the pan to create steam.
Troubleshooting Common Issues
- Dry Breast Meat: This usually happens if the chicken is overcooked. Use a meat thermometer! Take the chicken out when the breast hits 160°F, as carry-over cooking will bring it to the safe 165°F while it rests.
- Soggy Skin: Because we are pouring sauce over the chicken, the skin won’t be “cracker-crisp” like a traditional roast. However, to prevent it from being rubbery, ensure the skin is well-browned during Phase 1 before the sauce is added.
- Bland Meat: This occurs if the salt isn’t allowed to penetrate. Season the chicken the night before (dry brining) if you have time. This allows the salt to season the meat deep down to the bone.
Health Benefits of This Dish
This recipe is a nutritional powerhouse.
- Protein: Chicken is an excellent source of lean protein, essential for muscle repair and satiety.
- Capsaicin: The chilies in the enchilada sauce contain capsaicin, which can boost metabolism and have anti-inflammatory properties.
- Lycopene: If using a tomato-based sauce, you’re getting a dose of lycopene, a powerful antioxidant.
- Gluten-Free: As long as your enchilada sauce is thickened with cornstarch or reduced naturally rather than using flour, this dish is naturally gluten-free.
The Cultural Fusion: Mexican Flavors Meet American Roasting
The Enchilada Whole Chicken is a beautiful example of culinary fusion. It takes the “Sunday Roast”—a staple of American and European homes—and infuses it with the soul of Mexican “Comida Casera” (home cooking). The word enchilada literally means “seasoned with chili.” By applying this concept to a whole roast, we pay homage to the ancient use of chilies in Mexican cuisine while utilizing modern roasting techniques that maximize yield and flavor.
In many Mexican households, “Pollo Asado” (roasted or grilled chicken) is a weekly necessity. This recipe takes that tradition and marries it with the saucy, cheesy indulgence of the enchiladas found in Tex-Mex and Southwestern American cooking. It’s a dish that feels familiar yet excitingly different.
Essential Kitchen Tools for This Recipe
To achieve the best results, having the right tools is helpful:
- Cast Iron Skillet: The heavy metal retains heat beautifully, ensuring the bottom of the chicken cooks as well as the top. It also makes for a beautiful “rustic” table presentation.
- Instant-Read Thermometer: The only way to guarantee perfectly cooked chicken.
- Kitchen Shears: Essential if you decide to spatchcock the bird.
- Pastry Brush: For evenly distributing the sauce over the nooks and crannies of the chicken.
Detailed Ingredient List and Ratios
For a standard 4lb Chicken, use these proportions:
- The Bird: 1 Whole Roaster Chicken.
- The Rub: 2 tbsp Olive Oil, 1 tbsp Chili Powder, 1 tsp Cumin, 1 tsp Garlic Powder, 1 tsp Smoked Paprika, 2 tsp Kosher Salt, 1 tsp Black Pepper.
- The Sauce: 15 oz (approx. 2 cups) Red Enchilada Sauce.
- The Topping: 1.5 cups shredded Monterey Jack cheese, 1/4 cup chopped fresh cilantro (for garnish), 1 sliced jalapeño (optional), 1 lime cut into wedges.
Making it a Tradition
This Enchilada Whole Chicken recipe is more than just a quick fix for a weeknight dinner. It is a dish that invites people to the table. There is something inherently communal about carving a whole bird. When that bird is covered in a vibrant red sauce and glistening with melted cheese, it becomes a celebration.
It’s the perfect dish for Cinco de Mayo, game days, or a cozy Sunday night. It bridges the gap between a formal roast and a casual taco night. By mastering this recipe, you add a versatile, flavor-packed weapon to your culinary arsenal that is guaranteed to impress every time.
Summary of the Cooking Process
- Prep: Dry the chicken, rub with oil and spices.
- Roast: 400°F for 45-50 minutes.
- Sauce: Coat the bird in enchilada sauce.
- Cheese: Top with cheese and roast at 375°F for another 15-20 minutes.
- Rest: 15 minutes of resting before carving.
- Garnish: Fresh cilantro and lime juice to finish.
The result is a tender, flavor-exploding chicken that will have everyone reaching for seconds. The sauce and drippings at the bottom of the pan are “liquid gold”—make sure to spoon them over the meat when serving!
This Enchilada Whole Chicken proves that you don’t need a hundred ingredients to make a meal that tastes like it came from a high-end restaurant. With a few pantry staples, a good chicken, and a bit of oven time, you can create a cheesy, easy dinner that will be the new favorite in your household.